Palm Frond
Carvings
Then & Now
By: Laurie
J. McNeil - 2006
This
article is a compilation of four articles spanning a period of forty
years. These articles were written by
Lew Clingan, Roger Barton, Del Herbert, and myself, and published in
various magazines over a 16 year period. I felt it was important to
include all of these informative articles, so that those who are
considering carving a palm frond for the PSWA California Open, will have
access to as much information as possible.
From the history of palm frond decoys, to carving and painting them, these
articles have it all. In addition, at the end of these four articles, I
will be following with an update on the Palm Frond Carving Competition
which is exclusive to the California Open, and providing resource
information on where you can get a palm frond for the next PSWA show, in
February 2007.
|
 |
Palm Frond Decoys
By: Lew Clingan
Originally Published:
1966-1967 DECOY COLLECTOR'S GUIDE
|
|
 An
interesting type of decoy unique to the West, and to California in
particular, is the "Palm Frond". I would like to show you some of the
better examples and record al of their history. An
interesting type of decoy unique to the West, and to California in
particular, is the "Palm Frond". I would like to show you some of the
better examples and record al of their history.
Let me point out that the palm frond is an honest use of a cheap,
available material with certain other very desirable characteristics. It
is light, strong, requires a minimum of work and is easily cut. Nature
equipped it with a keel and the basic configuration of a pintail.
Assorted sized provided variation. The only work required is a rounding
of the the front and a slight shaping of the tail and you are in
business. Such a decoy seems well suited for the protected interior
valley weather and water conditions.
The first ones
were made in the early 1930's at about the same time balsa and cork were
again invading the market. Attention was paid to the heads and painting
on these early one and they are the best from a collector's point of
view. The only palm frond species I know of are pintail, mallard, Canada
and Snow Geese. I am not sure who made the first one, but it is
generally accredited to George Bud" Peters, Claude Keggy, or the Mello
Brothers.
Bud Peters, according to his brother, made and sold approximately 1,500
palm frond decoys before he passed away in 1947. His work is illustrated
in Photo 1. The decoys are in mint condition never having been used for
hunting.
 Claude Keggy of Rio Vista is reported to have made
and sold several hundred palm frond decoys.
Claude Keggy of Rio Vista is reported to have made
and sold several hundred palm frond decoys.
Jack and Henry Mello made only goose decoys for their own use. While they
shot ducks which came into their spread, they didn't make duck decoys.
Photo 2 shows an early much used Canada palm frond. The Mello brothers
eventually went from palm fronds to their version of the slat-goose
decoy covered with canvas.
These early palm frond decoys were unsatisfactory from a hunter's point
of view on two counts which are peculiar to our local hunting
conditions. First, although palm fronds initially float high and dry, if
left out overnight, they become waterlogged. Linseed oil and paint were
used as a sealer but the fronds are so dense that the seal was not
effective. While it will come as a shock to many, local hunters simply
would not use a material which had to be picked up after each hunt.
Birds were plentiful and easy to come by. Several hunters then used palm
frond decoys as "stick-ups", which solved the waterlogging problem, but
not the muskrat problem.
While normally not a food source, per se, during periods of short food
supply, muskrats would gnaw just enough of the decoys to render their
continued use impractical. Photo 3. So after several years of experiment
the material was abandoned.
In recent years most clubs require a large number of decoys and hunters
have turned to old, crude stick-up palm frond decoys to meet this
requirement. Such decoys will not excite collectors, but with the
quality of synthetic sealers available today, who knows what tomorrow
may bring.
Palm Frond Decoys of
California
By: Roger
W. Barton
Originally
Published:
WILDFOWL CARVING
AND COLLECTING
Winter 1990 Volume V Number 4
|
 |
| Canada Goose, made in 1977
by Bob Sutton, of Long Beach, California, required extra
long frond, and is smoothed with applications of auto body
compound and decorative inserts. Photo courtesy of Eleanor
Mosca, of La Jolla, California |
|
Muskrats
are a major problem facing working palm frond decoys, second only to
waterlogging. If left out at anchor, or piled up in a blind, the fronds
offer a food source for those rodents, which either nibble holes enough
to destroy buoyancy, or consume them entirely.
Ed Snyder, famed decoy carver of Rio Vista, claims that he once made a
rig of palm frond coots, and after using them, left them floating in a
drainage ditch while he packed off home. When he returned several days
later, all that remained were scraps and flakes of black paint
visible beneath the water. "Damn rat ate all but the paint", laughs Ed,
whose opinion of palm frond decoys as a waste of time has been no secret
since.
But the muskrats will never get a sniff at the type of palm frond decoys
now being made in the West. They continue to be popular entries in our
service class contests as the are easy to make, with a sweeping body
shape that demands imaginative paint patterns.
The palm frond decoy comes from the thick "butt" of the frond that
attaches to the trunk of the palm tree, and only the last two feet of
the larger fronds will serve. If sawn off while still green, this
butt is very heavy and wet, and must be dried for some time before
shaping. When completely dry, the center of the butt will be porous and
pulpy, with characteristics exactly like those of poor grade balsa. The
top and underside of the frond, however, has a strength, rigidity and
texture very similar to bamboo. |

Harold W. ("Pappy") Kidwell (1895-1982),
claimed - probably correctly - to have made and sold more
palm frond decoys than anybody, during the last 50 years of
his life. Invent and adept in most any medium, Pappy
preferred cork, balsa and frond, and his exuberant and
unsophisticated paintin style exactly suited such expendable
materials. "I make decoys for the ducks, not the damn
collectors", he once said. |
 |
Thickest
portion of the frond. which attaches to the trunk of the
tree, is the only section suitable for decoys. This photo
illustrates how the shape of the frond dictates the shape of
the decoy. |
History
Although occasional Eastern visitors to the West have assured me
that there is a tradition of usage of palm fronds decoys in certain
coastal regions of the Southeastern U.S., I have never seen anything
written on the subject, and so I assume that this easily constructed,
cheap and expendable style of decoy has never exited the interest of
collectors there.
Out in California, we have not only a continuing tradition, but also a
short written history ("Palm Frond Decoys" by Lew Clingan in the 1966-67
annual of the old Decoy Collector's Guide), which served to
revive current interest in making fanciful and stylish decoys from this
throwaway material.
The earliest accounts of the usage of palm frond decoys go back no
further than the 1930's, when imported and decorative palm trees became
common in certain regions of the state. In his 1966 DCG article,
Lew Clingan suggests that his own central Sacramento Valley area was the
place of origin, and as the marshes, deltas and bays formed by the
Sacramento and San Joaquin rivers have always been among the most
productive waterfowling spots in the West, his bias may be the correct
one. He told me that the leafy and durable palm fronds were commonly
used by hunters as cover for their blinds, and when the thick and light
weight butts were chopped off and discarded, some sharp-eyed hunter may
have discovered a higher use for them upon the instant.
As for southern California, where palms proliferate in even greater
numbers, Lew said that he had never discovered evidence of old rigs of
frond decoys. Wherever they were first used, they would hardly have
become collectors' items. Made of a trash pile material, with interiors
edible by vermin, and unlovely exteriors, palm fronds were never built
for posterity.
Lew attributes credit for the introduction of frond decoys to several
other old-time hunters along the Sacramento: Jack and Henry Mello, who
fashioned rigs of goose decoys for their own use; Claude Kagee, of Rio
Vista, famed as a member of a great goose-calling team of market hunters
known a the "Doc Stuart Outfit", who were active around 1910; George
("Bud") Peters, of Dixon, who, before his death in 1947, had made and
sold hundreds of frond decoys, of which the better ones eventually found
their way into gift shops.
But for sheer volume of production and dedication, the palm must pass to
the late Harold W. ("Pappy") Kidwell, of Berkley, who claimed that
during a period of "over fifty years", he had made 100,000 of the
things. These went to local duck clubs and seem to have been used up at
a prestigious rate. "I made 'em for practically nothing.", Pappy said,
The materials didn't cost me anything." For certain customers he added
the unusual precaution of dipping the decoys in hot tar to waterproof
and and ratproof them. "I guess them rats didn't like the tar in their
teeth.", he explained.
 |
On this
pair of mallard decoys made by the author, the palm butt has
been reversed to give characteristic high-tailed swimming
pose. |
Because palm frond decoys were quickly made and always considered
expendable, their usage declined as the equally cheap but more
serviceable plastic decoys came along, to sweep the fields clear of all
obsolete and inefficient folk art. But a whisper of the palm frond
tradition was saved by Lew Clingan's brief essay in that long-ago
article in a now-defunct journal. A handful of western carvers, grown
tired of the niggling demands of cheerless, high- pressure, high-tech,
"competition grade" carving, read his words and took note. Through these
carvers the palm frond tradition lives.
Roger Barton has
written for WC&C Magazine in the Winter 1987 issue of where is article
appeared on Fresh Air Dick Janson, a decoy carver of California. Roger
also edits the newsletter of the Pacific Flyway Decoy Association.
|
Carving A Palm Frond
For The
California Open
By: Laurie J. Gmyrek
Originally
Published:
WILDFOWL CARVING AND COLLECTING
Summer 1998 Volume XXIV Number 2
Revised 1999
http://TheArtistry.com/palmfrond.htm
1995
In 1994 while reading through the PSWA California Open's
1995 show brochure, I noticed a new category called Palm Frond Decoys. The major portion
of the body was to be made from a palm frond. It was a 50/50, auction class and it
intrigued me. Bernie Glass was the contact for obtaining a palm frond. I called Bernie and
asked that he send one to me.
About two weeks later UPS rolled in and
delivered a computer box to me. I was puzzled because I hadn't ordered anything. I brought
the box down to my studio and upon opening it I found what I thought looked like a pod
shaped alien with a spiked tail. Then I realized that this was my palm frond.

It was about 3 ½ feet long and what looked like the tail
had an upward curve to it. The spikes were from the palm leaves that were attached at one
time. A palm frond, is basically the branch from a palm tree. The thick pod like portion
of the palm branch, which attached it to the tree, is the portion that is used for
carving.
In examining the frond I found a hard outer shell encasing
what was a soft cork like center at one end. As you go toward the other end the frond gets
thinner and the center becomes very fibrous, and quite strong.
I had decided to make an old squaw in a preening position.
The curve of the palm frond at the one end, lent it's self to the tail of the old squaw. I
then drew up a head that I would carve from tupelo and attach to the body portion of the
duck.
Once I had roughed out my head, it was time to fit the head
to the body. I cut the spikes off of the tail portion with my bandsaw, leaving just the
main branch with the upward curve and the thick pod area for the body. I didn't have much
shaping to do for the body with the exception of the breast area. This was meaty portion,
which had been trimmed up with a bandsaw before I got it.
Once I began shaping the breast with my rough out bit, I
found that the cork like center was very soft. If I wasn't careful the tool would, all to
easily, take more than what I wanted to remove. Once it was shaped I switched over to a
sanding mandrel which I also had to be careful, not to let it run, taking away more that I
wanted.
After fitting the head to the body, I finished off the
detail work on the head, eyes, and bill, then sanded it smooth. To attach the head, I used
a small dowel, drilling a hole in the body and in the head. I then used five- minute epoxy
to glue it on. I sanded the breast area by hand, and found that there were little fibers
that couldn't be sanded away. So I decided to just seal the piece with deft semi-gloss.


It didn't take much to seal the hard shell area, but any
area in which the shell had been carved away, took several coats before it stopped
absorbing and actually became sealed. Once the deft had completely dried, I found that the
little fibers that I couldn't sand before the sealer, had become brittle and were now
easily sanded smooth.
I hand painted the palm frond with Jo Sonja Acrylics.
Having never seen any type of palm frond carving, I was not sure what to expect from the
other entries when I arrived at the show. Bob Sutton, creator of this category exclusive
to the California Open, was pleased.

Bob told me that both pintails and old squaws were a
popular choice of species because of the shape of the frond. He went on to say that palm
fronds have been used for years as a material for decoys and that he had carved several of
them. He also told me that now I was officially a palm frond carver.
Considering that it was the category's first year, there
was quite a variety of entries in 1994. The carvers who participated, used and a lot of
ingenuity! Bill Browne carved a horned grebe dancing on the water, June Lyon carved three
herons, Del Herbert carved a shorebird that was mounted on a steel rod and when put into
motion would dip down as if to drink water. In all there were eleven entries.
Bill Browne took best in show, my old squaw took second,
and June Lyon took third. Del Herbert and several others took honorable mentions. Both
the grebe and the old squaw brought $600.00 at auction, at the Saturday night Banquet.
Now I was fired up. I asked Bob Sutton to send me another
frond for next year. I really liked the challenge of the medium as well as the challenge
of finding a bird in the palm frond.
1996
Just after the first of the year, I received a box from Bob
Sutton which contained three palm fronds. One large, and two smaller fronds. Bob thought
it would be nice to have three to choose from. I examined each one individually, looking
for a potential species for the subject matter.
After looking at the last frond, I took all three and held
them together, the big one in the center on the bottom, and the two smaller ones on the
top of the big one. I immediately saw an image of a falcon and thought of using all three,
with the large one for the body and the two smaller fronds as the wings.
I pulled out all of my reference and did some reading. I
learned that the Peregrine Falcon flies up to about 200 feet, spots it's prey, usually a
smaller bird, and then assumes a diving position called stooping. This was a perfect
scenario, for the image that was created when I put all three fronds together. A Peregrine
it would be.
I had only three weeks to pull this off. I designed the
head to fit on the frond and cut the frond to the specified length. This left the tail end
wide enough for a falcon. Then I shaped both of the smaller fronds into the wings and fit
them to the contour of the body. I carved the head from tupelo.
Once I had completely carved in the head detail, I used a
dowel and five minute epoxy to laminate the tupelo head to the body. I put epoxy in both
holes and on the dowel, as well as on both surfaces of the head and body that were to
meet. Using enough epoxy to have it ooze out, thus filling any gaps between the head and
the body.
Once the epoxy hardened, I carved the excess away with a
medium bud shaped cross cutter, being careful not to remove anything but the excess glue.
Then I hand sanded the seam. I found that the areas where the frond's shell had been
removed sanded too easily, and the epoxy, being harder did not.
To avoid having the seam line show, I sealed the head and
body with deft, and relied on the deft sealer to harden the soft areas, which allowed me
to sand the seam smooth, thus hiding the seam. I then sealed the wings and sanded them
smooth as well.
To attach the wings, I held the first wing in position on
the body and drilled two holes, the size of my dowels, through the wing and into the body.
I then cut the dowel down to pegs that were about a quarter of an inch too long, so that
they could be carved away, after gluing.
Once I had done this with both wings, I put epoxy into the
holes in the body for the first wing. I was careful not to use too much epoxy here, to
avoid having it drip out from under the wing. I lined up the first hole, applied epoxy to
the peg and inserted it. Then I did the same for the second peg on the first wing.
After the second wing was pegged on, I carved the extra
length of the peg, flush with the wing and filled any small holes with epoxy. After hand
sanding these areas smooth, I applied several coats of deft so that I could sand any sign
of the pegs away, leaving a smooth surface on the wing.

After working out a base to mount my palm frond on, I
painted the falcon, using the Jo Sonja acrylics. This was the second time that I had used
an airbrush to paint with. I loved it! Combined with hand painting I was very pleased with
the out come.
I was also very anxious about whether anyone else had
thought of using three fronds or of doing a bird of prey. I thought that maybe I would be
the first, and I really wanted to impress Bob Sutton.
When I arrived at the show, after registering I quickly
went to see what had been entered in the Palm Frond category. Wow! There were 16 entries
when registration closed. There was a pheasant, a grebe, an egret, a ruddy duck, a tern, a
hooded merganser, a flamingo, a green wing teal, a mallard, and several more.
It wasn't long after I arrived at the table that Bob Sutton
walked up to see how the category had fared. When he saw the peregrine he said, "All
right, this changes everything!" Bob had a few doubters in regard to the inclusion of
a Palm Frond category in the competition. He saw fine art in the Peregrine, a departure
from the crafty image that the medium had sported in the past.
The Peregrine went on to take Best in Show and sold for
$1,350 at auction on Saturday night to Betty Odine. It is pictured in the California Open
section of Competition '96.
 
1997
For 1997 I decided to carve a Red-tail Hawk perched on a
stump. I used the excess from the ends of the wing portions, as the leg portions coming
off of the hawk. I made feet from brass and epoxy and carved the talons from solid brass
rods. I carved the stump from a checked piece of tupelo, and enhanced it with growth rings
and cracks.
Unlike the three weeks I spent on the peregrine, I spent
about six weeks on the red-tail. I employed the same technique of using three fronds
again, pegging the wings and doweling on a tupelo head. This time I tried the new Chroma
Airbrush Colors for the first time. George Kruth, Georgetowne Arts, was instrumental in
the development of these new acrylics for wildfowl carvers. These may be used in your
airbrush or for hand painting, and offers a velvet matte finish artists have grown to
love.


This time when I arrived at the show, there were twelve
entries. There were two macaws, two pintails, two gulls, one with teeth, a tern, a
Shoveler and three more entries including my hawk. To my surprise and others, this year
the judges didn't feel my entry deserved a ribbon. I was disappointed, but I looked
forward to the auction.
Cliff Hollestelle took best in show with a
Scarlet Macaw...

Second went to
??? (If someone
know this, please let us know.)
Third
went to Bill Browne, also for a Drake Pintail...

Honorable mentions were awarded to Del Herbert for
his Herring Gull...

Thomas Stewart for his
Seagull with teeth (no photo available), Greg Pedersen for his
Arctic Tern...

and Peter Palumbo
for his Drake Shoveler....

At the Saturday night auction, the Palm Fronds went up for
auction. Cliff's Macaw fetched $1,400, my Red-tail came up for auction toward the end, and
despite the lack of a ribbon, it sold for $1,350, Greg's Tern sold for $775
to Betty Odine. Dennis & Carol Mack purchased Cliff's Scarlet Macaw and my Red-tail
Hawk.
1998
For my entry this year, I chose to use one very large palm
frond. My subject would be a Common Loon, dancing on the water, in a territorial display.
I carved the head from tupelo and attached it at the breast, again using the dowel
technique. Because of the softness of the palm frond, and for balancing purposes, I
laminated a piece of butternut to the base of the palm frond. I placed lead in the base to
serve as a counterweight, so that the piece could stand securely.


I painted the piece using the Chroma Airbrush Colors
exclusively. The iridescence on the head was achieved using the interference colors and my
Badger 100-8-SG Airbrush. The remainder was painted by hand using the airbrush colors
right out of the bottle.
This year the California Open celebrated their Silver
Anniversary Show. The Palm Frond category had its best turn out ever with 17 entries. Many
of the past years entrants and several new, but very famous names.
The judging produced 8 ribbons. Best of Show went to
veteran Palm Frond carver, Bill Browne III for this Pintail Hen....

Second was awarded to
first time entrant, John Gewerth for his Red-breasted Merganser Drake....

Third went to Paul Foytack for his Pintail Drake
was Paul's first try at the Palm Frond category too...

Honorable Mentions were awarded to Cliff Hollestelle for a really unique Great Blue Heron...

Del Herbert for a Whistling swan, using two separate fronds for wings, my Common Loon, and
Marcel Meloche for the first ever fish entry, a Brook Trout.
Other artists that entered included some very prominent
names, Victor Paroyan, Tom Christie, Peter Palumbo, and colorful R.D. Wilson, well known
auctioneer and carver.
The auction was different this year with the Palm Fronds
fetching considerably lower prices than previous years. This was due to the absence of
several regular collectors, leaving some beautiful pieces to be had for very good prices.
The top price for Palm Fronds this year was $950 for the Bill Browne's Hen Pintail, $750
for John Gewerth's Red-breasted Merganser, $500 for my Common Loon, which was purchased by
an unchallenged Betty Odine, and Cliff's Great Blue Heron fetched $475.
Though these pieces did not fetch the prices we have
experienced in the past, I know those who were fortunate enough to purchase these pieces,
knew this was a chance of a lifetime.
I look forward to the Palm Frond Category again in 1999.
Each year the artists are becoming more innovative in their designs. Champion carvers from
all over the US and Canada have come to find a category with few rules, provides more of a
challenge than meets the eye.
Bob Sutton should be proud that he has established a
category that has gained so much popularity since its inception 4 years ago. Rumor of
separate categories, with an over all Best in Show is being heard, so get your Palm Fronds
together and plan on entering in 1999. |
Palm Frond Sculptures
Part One
By: Del Herbert 2005
Carve a California classic.
Originally Published:
WILDFOWL
CARVING MAGAZINE
Winter 2004 Volume XX Number 4
|
In their
wonderful book Wildfowl Decoys
of the Pacific Coast,
Mike Miller and Fred
Hanson relate this information
about palm frond sculptures:
Redwood and balsa were the materials of choice for
most of California's decoy carvers. However, an
inexpensive California material, palm frond, was
frequently used. Palms are available in most
communities, and with seasonal pruning, a supply of
free decoy material is produced. Palm was used in
great quantities by Pappy Kidwell in his later
years, but the longest history of its use was in Rio
Vista and Fairfield, beginning with Claud Kagee.
Unquestionably, the handsomest palm frond decoys
came from the hand of Bud Peters of Fairfield.
Peters manufactured pintail decoys in great quantity, probably in
the thousands, and produced a few mallards and
white-fronted geese. Peters lavished care on shaping
and sanding the bodies, but chose to use Herter's
factory heads as an expedient.
The completed decoy was immersed in linseed oil, allowed to dry,
and painted directly over the dry linseed. The
counter weight consisted of thin strips of lead
about six inches from which a two-ounce fishing
sinker was suspended. Given the extreme lightness of
these decoys were that muskrats often feasted on
them, and those left in the water for more than a
few hours would begin to absorb water. This was
unacceptable in California where decoys are often
deployed for the entire duck season.
|
 Figure
1 Figure
1
For a palm frond sculpture,
you can use the first couple of feet of the butt section
that branches out from the trunk.
Near as I can tell, several contemporary carvers like
Bob Sutton, Roger Barton, Ed Snyder, and Dick Troon made
a few "modern" palm frond decoys, and their cocktail
party reminiscences kept the ideas alive. The, in 1995,
the Pacific Southwest Wildfowl Arts Association
introduced a palm frond competition as an auction
category to help raise money for the and the carvers.
This division remains extremely popular and has produced
some very creative palm frond "sculptures" over the
years.
For those who don't know, a frond is the leaf of a palm tree. We
use the first couple of feet of the butt section that
branches out from the trunk (Figure 1). This
section has a hard, strong outer shell and a fibrous
interior. As with anything in nature, there is a great
variety of size and shape to the fronds. Date palm
fronds work well because the have a large butt section
and assume a multitude of shapes, which help to jog the
artist's imagination.
Here's the challenge - to portray the "essence of the species" of
your subject matter and maintain as much as possible the
shape of the frond. Also, from a structural point of
view, we want to utilize as much of the outer shell as
we can. This places a premium on the imagination and
ingenuity of the carver. |

Figure 2
Here's is one of my many
preliminary sketches of the palm frond tropicbird.
When I first walked into
the convention center for the Ward World Championship
and spotted this large white bird with graceful extended
tail feathers, I immediately said to myself, "Self, now
there's an idea for a palm frond." As I got close enough
to appreciate the magnificence of Larry Barth's
red-billed tropicbird, I was a tad overwhelmed and that
idea in the "too hard" locker. However, later in the
year, I just couldn't get this inspiration out of my
head. I will use this project to demonstrate my
interpretation and methods of palm frond carving.
We are all fortunate to have photographs of Larry's great
tropicbird in numerous publications. They aided me
significantly in designing this project. First there was
the issue of fitting the necessary elements (tail
feathers, primaries, tertials and so on) to the frond.
Figure 2 shows the results of dozens of of
preliminary sketches for this project. As you will see
later, this sketch was modified greatly as the sculpture
evolved.
Part of the fun of palm frond sculpting is the search for the frond
that fits the needs of your project. For instance,
Figure 3 shows a large frond with a relatively
straight profile, which might be good for a large duck
or swan. |

Figure 3
This large frond would work
well for a large duck or a swan.

Figure 4
This is a smaller frond with a curved
profile, which turned out to be a good fit for my
tropicbird project.
Contrastingly, Figure 4 is a
smaller frond with a curved profile, which turned out to
be good material for my tropicbird.
The following photographs show my method for completing the
red-billed tropicbird. I have endeavored to generalize
my techniques a bit so the will e adaptable to other
projects as well.
In part two I'll paint the red-billed tropicbird palm frond. I'll
discuss feather layout, color mixing and finishing
techniques. I'll also include a few photos of my
favorite palm frond carvings over the past several
years.
 Though
this project might seem out of the ordinary, give it a
try. The experience will only make your conventional
bird carvings that much better. Though
this project might seem out of the ordinary, give it a
try. The experience will only make your conventional
bird carvings that much better.
A consistent best of
show winner and frequent contributor to Wildfowl Carving
Magazine, Del Herbert published his first book,
WORKBENCH PROJECTS: CHAMPIONSHIP SERVICE CLASS
SHOREBIRDS, IN 1998. |

1
The head pattern is
transferred to a block of jelutong wood. Note the the
weakest portion (the lower mandible) is aligned with the
grain of the wood. Also, to facilitate the carving of
the open bill, I will cut out the section marked by the
dotted line, then temporarily glue it back in place
while the head is carved.

3
The lower mandible section
is set back in place with hot glue. Note the
misalignment on the right-hand edge and bottom of the
block where the piece fits back in. This effect is due
to the width of the saw cut, it is also the reason the
pattern must be redrawn after the lower mandible section
is glued back in place.
 |

2
Cut out
the section for the lower mandible as shown.

4
The profile of the head is cut out on the band saw.
5 A suitable
piece of lumber is cut for the base section. I used
1¾-inch thick stock so the finished piece would have a
wide. stable base.
|

10
Here the head has been
shaped and the frond and body refined. I carve wooden
eyes in every bird to facilitate the final head shaping
and achieve my desired look (Note: for a detailed
demonstration of head-shaping and eye placement, see my
article "The Eyes Have It", which is included in the
WILDFOWL CARVING'S Reference Series: Pintail Drake.)
These will be ground out later to install glass eyes.

12
Here I am prepared to attach the
head to the base. |

11
The long, cantilevered tail
section gave me cause for some concern that the finished
piece might tend to tip aft. Therefore, a lead bar was
installed in the forward section of the base.

13
The head and base are glued
together with Bondo auto body filler, which is also used
to smooth the transition between the two pieces. |

14
The wooden eyes are ground out to
provide sockets for the glass eyes.

16
I elected to use PVC material for
the tail feathers. Here is the 16"-long section cut from
one-inch PVC material.

17
I use a heat gun on a low setting
to shape the tail feathers. Heat and bent the PVC very
slowly to avoid putting a kink in it. (Yes, that's
Judy's hand. I'm holding the camera.) |

15
The 9 millimeter brown glass eyes
are
installed with Apoxie Sculpt, and the breast
area is shaped with Bondo.

18
Cut out a section of the underside
of the frond to receive the PVC tail feathers. |
Palm Frond Sculptures
Part Two
By: Del Herbert 2005
Paint the palm frond
tropicbird.
Originally Published:
WILDFOWL
CARVING MAGAZINE
Winter 2004 Volume XXI Number 1
|
 |
Figure 1
Here is the primed sculpture.
The eyes have been cleaned off for the photo. I normally
don't clean them off until the painting is nearly
complete. |
|
In the
last issue we discussed a bit of the history of palm
frond decoys, and we "carved" a red-billed tropicbird
out of a medium-sized curved palm frond. I put carved in
quotation marks because only a small portion of the
sculpture was actually carved. Most of the sculpture was
fabricated from the palm frond and PVC. In this issue
we'll paint the sculpture. |
A consistent best of
show winner and frequent contributor to Wildfowl Carving
Magazine, Del Herbert published his first book,
WORKBENCH PROJECTS: CHAMPIONSHIP SERVICE CLASS
SHOREBIRDS, IN 1998. |

Figure 2
The major feather groups are
penciled on the primed surface with a Sanford
Prismacolor penicil. I normally use a color a shade or
two lighter than the feathers I will be painting.
Figure 3
Here is another view in color.
Note that the pencil marks are just dark enough to blend
into the over-all paint scheme - there is no need to
erase these marks. In Part One, I mentioned that I paint
the tongue and the inside of the upper and lower
mandibles before the lower mandible is epoxied in place.
This is done with a flesh- toned mixture of raw sienna,
white gesso and a touch of napthol crimson. The outsides
of the mandibles are painted with several coats of
Turners yellow and then overcoated with successive
blends of Turners yellow and napthol crimson. I used my
Badger 100SG airbrush to blend in the overcoats;
however, this can also be done with hand-blending if you
don't have a airbrush. |
 |
PROCEDURE

1 Steps
1 through 4 involve the painting techniques for the
tertials and greater coverts with the male and female
templates. The feathers on a tropicbird appear black and
white, but I chose to warm up the black with burnt
sienna (60 percent black.40 percent burnt sienna). Since
the palm frond is a "sculpture", we have more artistic
license than if we were painting a "realistic
decorative". I find the warm black more pleasing for
this project than the straight black, so that is what I
used. Here is the initial layout of the tertials with
the male template, with shafts added to define feather
flow. |
|

2
Add the dark internal patterns with the
female template using the same hue.
|

Primaries |
Figure 4
Tropicbird Feather Templates
Once I have achieved the
desired feather pattern, I cut templates for airbrushing
the feathers onto the carving. Note that I had to take
some artistic license with the size and shape of the
feathers to fit them in the surface of the frond. I use
medium-weight plastic template material available at
sewing/quilt shops to make the feather templates. |
|

Tertials

Greater Coverts
|

Large Scapulars

Small Scapular/Covert |
 |
15
Here is the
finished sculpture. I decided to place the bid on a
black cube to highlight the color scheme.
I hope you have had as much fun with this project as I did. Again,
projecting the essence of the species of your subject
while maintaining the character of the palm frond can be
a challenge to our artistic skills, but it is often well
worth the effort. Addition information and photographs
of this subject are provided by Laurie Gmyrek in the
Summer 1998 issue of WILDFOWL CARVING MAGAZINE and "Palm
Frond Decoys of California" by Roger W. Barton on the
Winter 1990 issue.
16a through e are some examples of how others have interpreted palm frond
projects over the years. |

16a
Pintail,
circa 1974 by Bob Sutton of Long Beach, California.

16b
Pair of pheasants,
circa 1997 by Cliff Hollestelle of Lincoln, Nebraska.

16c
Tundra Swan, circa
1998 by the author, Del Herbert of Chula Vista,
California. |

16d
Clark's Grebe,
circa 1995 by Bruce Buckley of Costa Mesa, California. |
|
16e
Pintail, circa 1993
by Bill Browne of Lincoln, Nebraska. |
 |
Palm Frond
Carvings
Then & Now
(Continued)
I have
found that I enjoy using a palm frond that has the majority of the original
characteristics still intact, such as those pictured below....


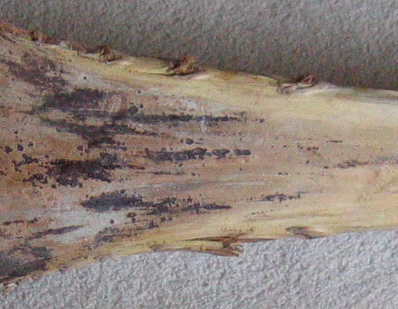
Many
times, when the palm fronds are harvested, and the the unique
qualities of the frond are removed by a band saw. When trimmed, the
band saw removes the gnarled edges which are indicative of the palm
frond. For me, a big part of the challenge is incorporating the
natural characteristics of the frond, as seen above.

For
the 2004 California Open, I chose to carve a female Kestrel. I
selected a smaller palm frond and used the "tail-end" because the
width was appropriate for the subject. When you use this part of the
frond, you'll find that it becomes stringier and less cork-like,
thus making the material stronger.
This
time I decided to try carving the entire piece out of the frond,
rather than using tupelo wood for the head, as I have done with my
previous palm frond carvings. I figured I would try to carve the
head entirely of the frond material, and if I did not succeed I
could laminate a wooden head, as I have done in the past.
As I
carved the head, I was pleased with the look I had achieved. I
carved the eyes out of the frond, much like Del does, then
once I was happy with the look, I carved away the eyes and cleaned
out the sockets so that I could insert the glass eyes. Now it was
time to attempt carving the beak.
On a
Kestrel, there is a tiny hooked tip, used for tearing at its prey.
Even the slightest slip with my Dremel, and the entire beak could be
destroyed, which would mean I would have to carve the head from
tupelo and laminate it onto the frond.
I
roughed out the basic shape with my Dremel, then I stepped it down
to my Micro-grinder and my 3/32" mini diamond bits. I carved in the
definition between the upper and the lower mandible and things
started getting pretty dicey at this point. Then I remembered a
trick I had used back in 1986 on my Canada Goose head, and the drop
of water I had carved, dripping off of the trip of the bill. I had
heard that Superglue would strengthen the wood, and I soaked the
tip. To my surprise, when I did this, there was actually ribbon of
smoke which rose from the area I had applied the Superglue.
A day
later, during the competition, I learned a tough lesson regarding
this strengthening technique. While the wood itself may be stronger,
it is also very brittle. The drop of water was broken off of the tip
of the bill during the judging, and found in the recess of the
whirlpool of water beneath the head. If I had left the tupelo alone
and not used the Superglue to strengthen the wood, the tupelo may
have been forgiving enough to survive a slight hit and the drop of
water may have not been broken off.
Another danger I had learned during this trip to the North American
Show in Livonia, Michigan, and not really related to palm
fronds, but certainly worth passing on, is that a person should
NEVER wood burn over an area of the wood that has had Superglue
applied. There was a carver at the show, and I do not remember his
name, but he had gone blind, because he had wood burned over
Superglue. So be forewarned. I never used this technique after this,
knowing that nature of tupelo allows it to give or bend, when pressure
is applied.
Though
it may not have been the best technique for the Canada Goose Head, I
felt it was a way to control the punky nature of the frond, and
perhaps allow me the stability to carve in the fine detail of the
Kestrel's beak. So I saturated the beak with Superglue and allowed
it to harden. This was what I needed to enable me to carve this
piece entirely from the frond.
When
it came to a base, I was perplexed. I did not want to carve feet for
the piece and I had considered painting feet on, but on second
thought decided not to. I found a piece of tupelo which still had
some bark on it, and used the bark side on the front to create
texture and interest. I attached the Kestrel to the base using brass
channel and a brass rod. I painted the piece entirely by hand, using
Chroma Airbrush paint out of the bottle, combined with some Jo Sonja
colors.
Though
this is my second favorite palm frond, of all the fronds I have
carved for the California Open. It only received an Honorable
Mention. It was purchased by Betty Odine of Riverview Michigan.

In 2006, I decided to
carve a Black-billed Magpie. I felt the long nature of the Magpie's
tail lent itself to the shape of a palm frond. Again, I chose to
carve the piece entirely from the frond, and not carve the head from
tupelo. This time I did not use Superglue to strengthen the beak,
and the piece was damaged during the competition, resulting in the
beak being broken off. I can't say whether or not the beak would
have been broken if I had strengthened it with Superglue, but the
design of the carving left the beak exposed and I believe it was
tipped over and landed on the beak, thus breaking it off. Bob Sutton
purchased the Magpie, despite the damage, and I am currently carving
a tupelo head to laminate onto the frond for Mr. Sutton.
So you can see
in some cases, you may get away with using entirely the frond,
however, it is important that you look toward the future in any
carving you do, especially a frond carving that utilizes the inner
material for an area as important as the head. If this area is
vulnerable unlike the Kestrel, but such as the Magpie, it may be the
best decision to carve that area from wood.
The
species I have carved are as follows...
Old
Squaw Drake, Peregrine Falcon, Red-tailed Hawk, Canvasback Hen,
Burrowing Owl, Common Loon, Female Kestrel, Black-billed Magpie.
The
preceding articles have covered the history of palm frond decoys,
techniques of carving palm frond decoys and sculptures, and provided
valuable insight and instruction for anyone who may be interested in
carving with this unique medium. Below is information on how you can
purchase a palm frond from the best supplier, Chet Wilcox. When you call
for your frond, be specific about the size you need and if you want it
with the edges intact, he has both and is always happy to meet your
needs. If you attend the California Open
or the PFDA Show
in Sacramento, you'll be able to choose your fronds directly from Chet.
Chet
Wilcox
Wil-Cut Carving Supplies
7113 Spicer Dr
Citrus Heights, CA 95621
(916) 961-5400
These
are the the Rules and Awards for the Palm Frond category for the
PSWA California Open
held February 24th & 25th, 2007:
Palm Frond Carvings
Sponsored By: Doug & Ellen Miller
Major
portion of body must be made from a palm frond. The challenge is to
portray the "Essence of the Species" of your subject, while
retaining as much of the character of the frond as possible. Carvers
may elect to have their pieces auctioned or not, by checking the
appropriate block on the entry form. Carvers receive 50% of the
auction price.
|
Best of
Show - $1,000 PURCHASE AWARD
Second Best in Show - $750 PURCHASE AWARD
Third Best in Show - $500 PURCHASE AWARD
1st, 2nd, 3rd, and H.M. Ribbons in each category
|
If
you have any palm frond carving photos which are not included in
these article, please feel free to send them to me via e-mail or on
CD. If you need my mailing address for sending a CD, e-mail me at:
Laurie@TheArtistry.com
Many
thanks to these people who contributed to the content of this
collective article...
Bob Sutton
Roger W. Barton
Del Herbert
Lori Corbett
Home
|


